Freitag, 29. Juli 2016

Getting Started: ESP8266-12E [ENGLISH]


First solder your ESP to a Prototype-board, because the Solder-Points of the ESP only have a distance of 2 millimeter. So if you like to work with prototype-boards with the distance of 2.45 mm between the holes you should do that. Therefor use a prototype-board which has dimensions of 10x12 usable holes.


Then Connect the ESP which is soldered on the board on a breadboard. You can do this with long wires or you can use two Breadboards and plug the ESP on top of the „Supply-Channels“.
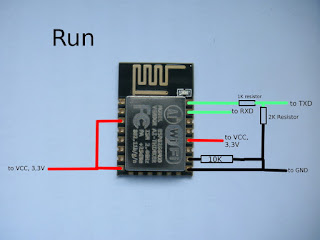
To Run the ESP-Module, like run AT-Commands Connect the Module like this. TX and RX go to a USB to TTL Converter which is plugged into your computer. GND and 3.3V go to an external power-supply. Now you can check with the AT-Commands which you can send with the Serial Monitor of the Arduino IDE or with Putty to the ESP if all works correctly.                                     


Mittwoch, 13. Juli 2016

Drucker zu CNC

Voll die tolle Idee

Warum nicht um die Ecke, über ebay-kleinanzeigen oder woher eine Drucker-Scanner-Kombination suchen und in eine CNC-Maschine umwandeln? Ich fänds toll, wenn ich das mal hinbekommen würde. 
Die Idee besteht schon. Als Anleitung dafür würde ich die Videos von Tinkernut nehmen, in denen er aus drei DVD-Laufwerken ein CNC-Gerät baut. Hier meine Kurze Gedankenstütze:

Hardware

- Arduino (Uno oder Nano, aber eher Nano), hab ich
- 3x Schrittmotortreiber, am besten wie im Video, also mit dem A3967-Chip
- Drucker mit Scanner-Einheit
- Ich habe in einem Teardown-Video gesehen, das der Motor, der den Schlitten mit den Tintenpatronen bewegt kein Schrittmotor ist. Somit brauche ich dann wahrscheinlich noch einen Schrittmotor.

Software

GRBL damit der Arduino das Protokoll interpretieren kann
- und zum Upload auf den Arduino XLoader
GRBL-Controller um das Gerät zu steuern
makercam.com um Projektdateien zu erstellen

Visueller Plan