
First solder your ESP to a Prototype-board, because the Solder-Points of the ESP only have a distance of 2 millimeter. So if you like to work with prototype-boards with the distance of 2.45 mm between the holes you should do that. Therefor use a prototype-board which has dimensions of 10x12 usable holes.
Then Connect the ESP
which is soldered on the board on a breadboard. You can do this with
long wires or you can use two Breadboards and plug the ESP on top of
the „Supply-Channels“.
To Run the
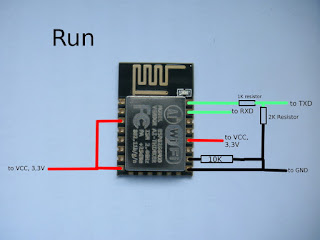
ESP-Module, like run AT-Commands Connect the Module like this. TX and
RX go to a USB to TTL Converter which is plugged into your computer.
GND and 3.3V go to an external power-supply. Now you can check with the AT-Commands which you can send with the Serial Monitor of the Arduino IDE or with Putty to the ESP if all works correctly.

To flash the ESP with a new firmware or an NodeMCU/ Arduino-Sketch. Therefor Connect the ESP like this. A tutorial how to flash can be found on Youtube. It also contains all necessary tools you need.

To make the process to flash and run the Chip easier I made myself a programming-board. With this you don‘t have to change the cables and only have to move the two switches. You can plug the ESP to the shield and can flash it. To run the code and test it the board has also female headers to use it in combination with a breadboard.
Put the link
http://arduino.esp8266.com/stable/package_esp8266com_index.json
into the "Additional Boards Manager URLs" - line in the Preferences-Tab, then search for "ESP" in the Boards-Manager (Tools -> Board -> Boards Manager) and install the ESP - Plugin. Then you could set your Board-Preferences and upload the code…. Which takes a bit more time than to upload it to an Arduino.You should recognize that it is only possible on Windows to flash the ESP in this way. To do this on Linux or Mac you must add the esptool to your Programmers. The following Link will help you: https://github.com/themadinventor/esptool
Useful Links:
Power ConsumptionCOntrol your ESP with Web surface


Keine Kommentare:
Kommentar veröffentlichen